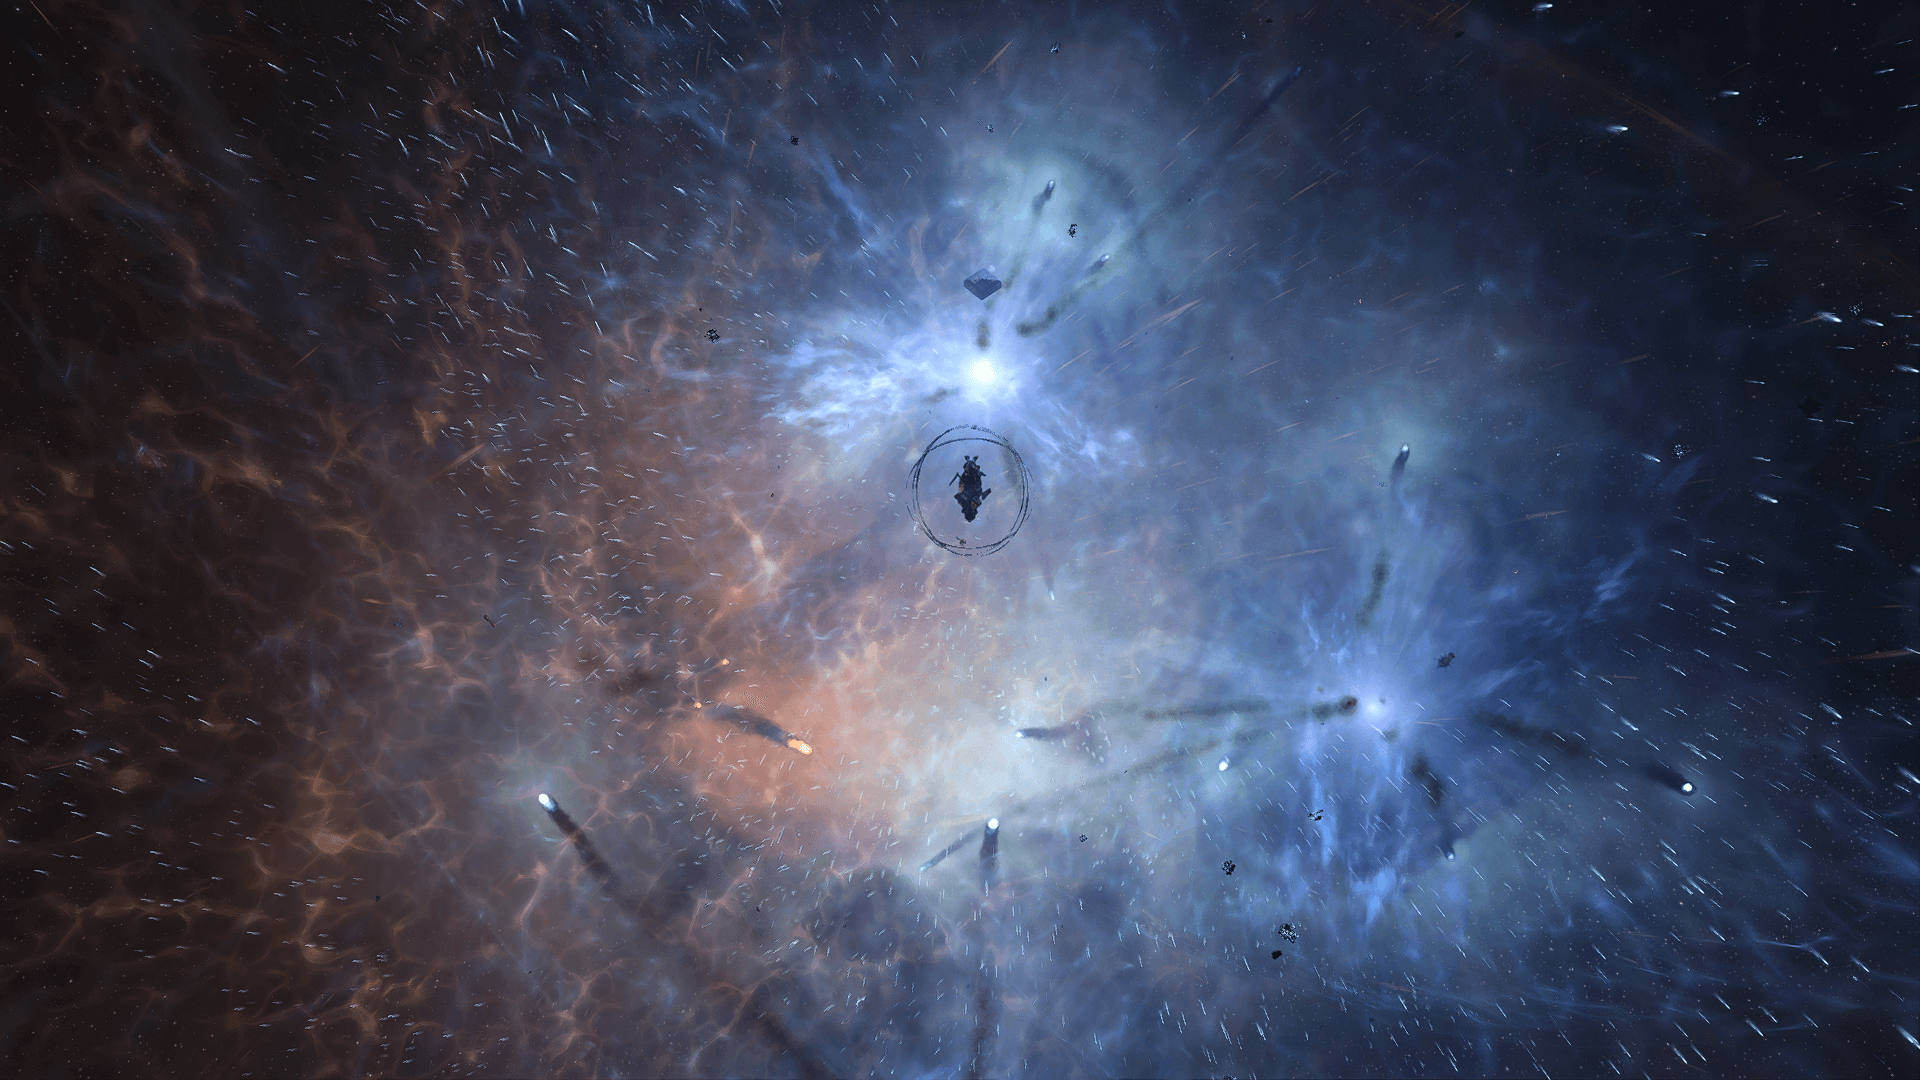
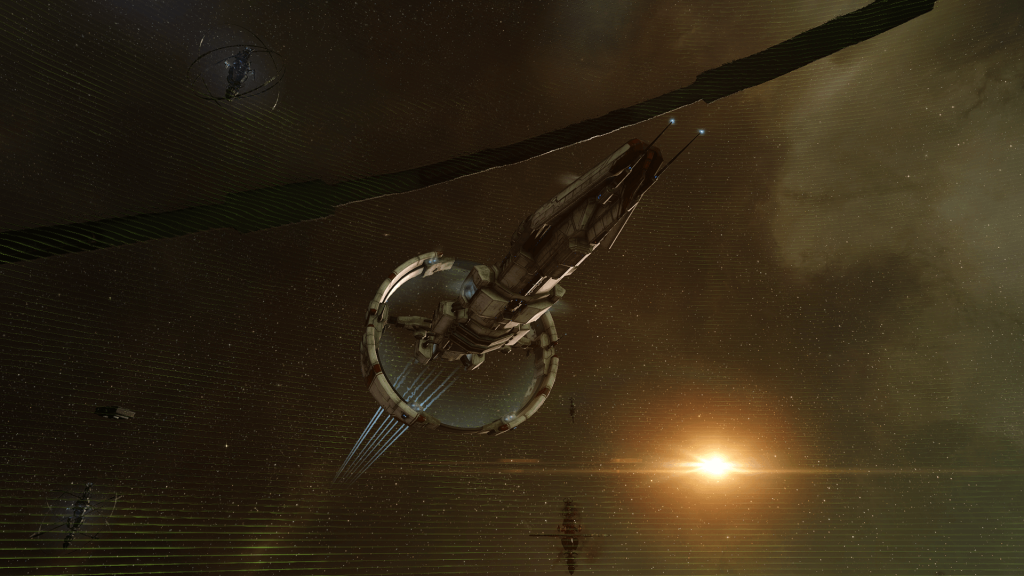
Come on, ghost sites aren’t that scary. Why yes, that’s a screenshot of a ghost site explosion. Why do you ask?
The Basics
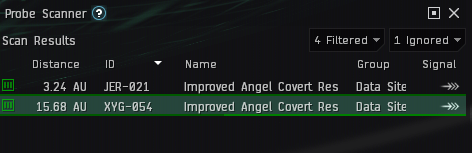
Ghost sites are unique exploration sites found in every part of New Eden: hisec, lowsec, nullsec, and wormholes. They always appear in the probe scanner as level 3 data signatures, except in the null drone regions (Cobalt Edge, Etherium Reach, Malpais, Outer Passage, Perrigen Falls, The Kalevala Expanse, and The Spire), where they show as level 1 combat signatures. For some reason. And with their drops skyrocketing in price, it’s never been a better time to run them.
All ghost sites are named [Prefix] [Faction] Covert Research Facility. For example, “Improved Sansha Covert Research Facility.” That’s not to be confused with Beseiged Covert Research Facilities, which are proper lowsec combat sites.
As always, the EVE Uni Wiki has a lot of useful stats and information regarding these sites.
The Sites
The exact nature of a ghost site (as well as the loot that can drop) depends on the type of ghost site. Each kind of space (high, low, null, jspace) has its own type of ghost site:
| Space | Site Prefix | Number of Cans | Common Can | Unique Can |
| HS | Lesser | 5 | Secure Depot | Secure Lab |
| LS | Standard | 5 | Secure Lab | Secure Databank |
| NS | Improved | 4 | Secure Databank | Secure Mainframe |
| Wormholes | Superior | 4 | Secure Mainframe | Secure Vault |
A ghost site’s faction (Angel, Blood, Guristas, Sansha, Serpentis) is determined by the pirate faction whose sites normally spawn in that area of space. It’s random in wormholes and appears to also be random in the drone regions. Ghost site faction doesn’t impact anything except the damage the rats deal.
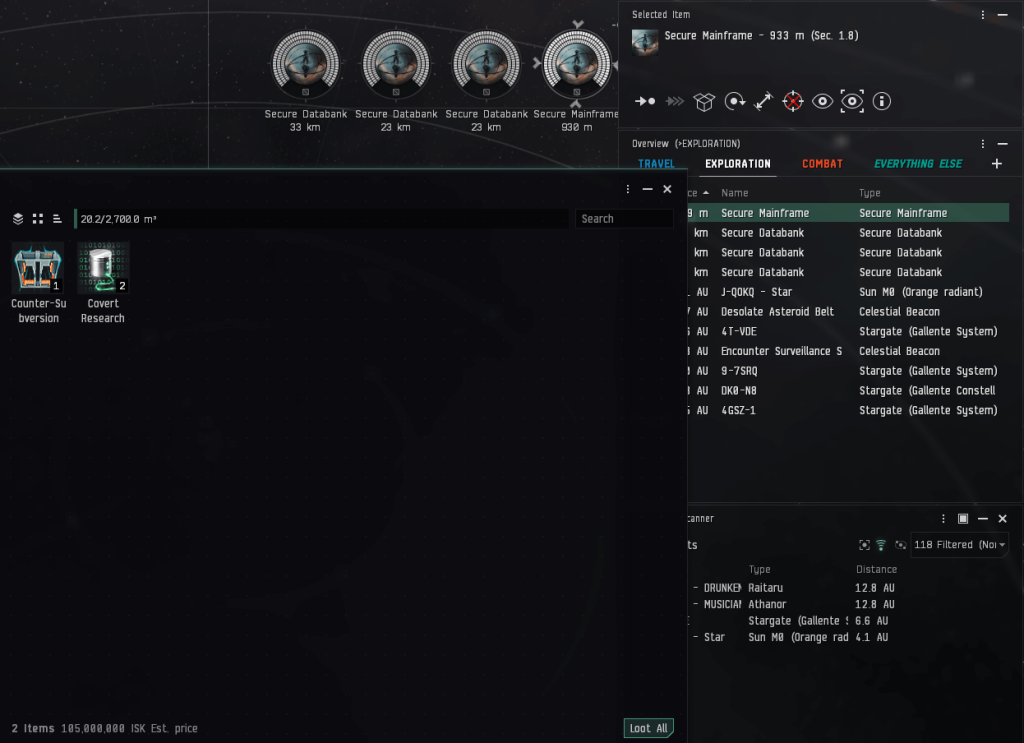
All ghost sites have 4 cans equally spaced apart from warpin, roughly 23km apart in a square. One of these cans will have a different name than the others, and will feature a harder hack outside of hisec. Every ghost site of the same type will have the same cans. As you can see in the table above, highsec and lowsec ghost sites have a 5th can above the center of the site. This can may be of either type of can found in that site. The 5th can usually contains nothing in hisec ghost sites. It’s guaranteed to have an Electro-Neural Signaller in lowsec ones (worth over 220 million ISK as of writing).
Here’s the hacking difficulty of every ghost site can:
| Can Name | Location | Core Difficulty |
| Secure Depot | HS | 50hp Green |
| Secure Lab | HS, LS | 50hp Green |
| Secure Databank | LS, NS | 70hp Green |
| Secure Mainframe | NS, Wormholes | 70hp Yellow |
| Secure Vault | Wormholes | 90hp Red |
As you can see, most ghost site cans are pretty trivial to hack, with Improved sites in null only having 1 yellow hack in the oddly named can. However, Superior sites in wormholes are decently tough, especially if you don’t have high skills or good equipment. The Secure Vault can in particular actually has a good shot of exploding on you if you panic or slip up.
The Timer (and Light Show)
All ghost sites have a hidden timer. This timer starts ticking when someone either decloaks in the site or initiates warp to the site uncloaked. For this reason, it’s better to run a covops cloak when attempting a ghost site (as if you didn’t already have enough reasons to use one). The timer is random, believed to be anywhere from 30 seconds at the low end to 3 minutes. On average, a decently fast hacker should have enough time for at least 2 cans before the timer runs out.
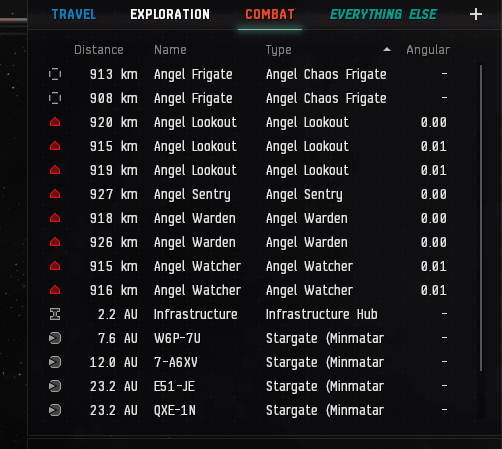
When the timer runs out, 2 things happen. Rats warp in, and the cans explode. Can explosions deal explosive damage and have a range of around 10km. The rats deal faction-specific damage, so they’ll do EM and thermal in a Blood Raider site. The rats warp disrupt your ship and deal a lot of damage, but they take a bit of time to actually lock you and warp away around 30 seconds after showing up even if you’re still alive. A covops frigate or similar has enough time to warp away before the rats attack. The real danger to frigates is the can explosion. The damage varies depending on the type of space you’re running the site in:
| Space | Explosion Damage |
| HS | 6000 |
| LS | 8000 |
| NS | 10000 |
| Wormholes | 12000 |
For whatever reason, the can explosion triggered by rat warpin, and the rats actually doing anything to you themselves, will often be delayed by around 20 seconds. However, if you fail any ghost site hack, the can will explode instantly. No 2 tries for you. Closing the hacking window, say by trying to warp off during a hack, will also trigger the explosion.
This means that if the rats show up and your ship can’t handle the explosion, you’re always better off trying to finish the hack and warp off instead of closing the hacking window in a panic. At least trying to finish the hack gives you a chance to survive. I’ve gotten surprised by rats in plenty of ghost sites and lived to tell the tale by doing this. If the rats manage to lock you and you know you’re about to die, eject your cargo into a can and bookmark it so you can retrieve it later. The rats won’t mess with your pod. It’s good practice to make a bookmark in ghost sites anyway, just in case you do lose your ship.
Interestingly, the 5th can above hisec and lowsec ghost sites will not explode with the others (as you can see in the page image), and will stay there even after the rats leave. This means that you can make an ongrid perch bookmark while warping into the site, leave the 5th can unhacked, warp to the perch before the rats show up (they won’t attack you at that range even if you’re uncloaked), and warp back to the 5th can and hack it after the rats leave. Don’t sit around too long though, or the site will despawn and take the 5th can with it.
Something else to keep in mind is that due to ghost site cans being around 23km apart from each other, it’s impossible to take damage from more than 1 can explosion simultaneously.
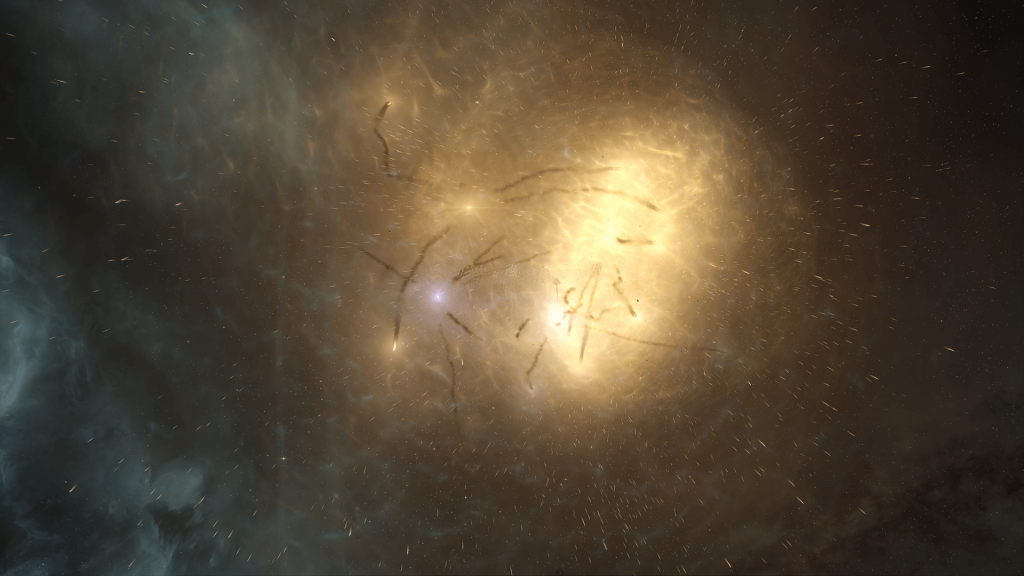
In case you’re curious, null ghost site rats look like this:
The Loot
As mentioned, the 5th top-center can in LS ghost sites always contains 1 Electro-Neural Signaller, while the top can in HS sites is usually empty. The other loot varies based on the type of site and can.
Potential loot drops include Mid-Grade and High-Grade Ascendancy implant blueprint copies, with oddly named cans and cans in higher tier sites having higher grade ones in their loot tables. This culminates in the High-Grade Ascendancy Omega BPC. It’s a rare drop worth billions, found only in the Secure Vault can in wormhole ghost sites. Cans tend to contain Covert Research Tools, an industry material used to make structure rigs that can also be sold to pirate buy orders in regions like Venal for 500k ISK per unit. HS and LS sites often drop Shattered Villard Wheels, used to make Ascendancy implants.
Other drops include ‘Wetu’ and ‘Yurt’ Mobile Depot BPCs, ‘Packrat’ MTU BPCs in Secure Databank cans in low and null, ‘Magpie’ MTU BPCs in Secure Mainframe cans in null and wormholes, and even fully built Magpies in wormhole Secure Vaults. BPCs for all HG Ascendancy implants except Omega can drop from nullsec ghost sites.
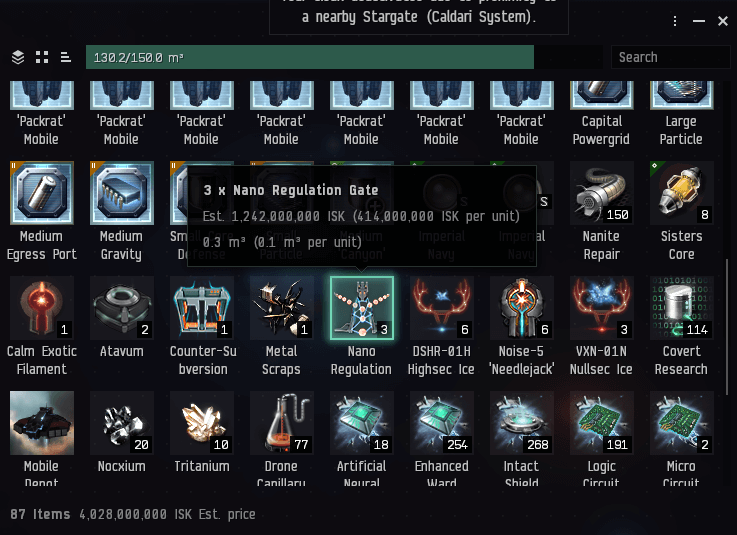
Null and WH ghost site cans, specifically Secure Mainframes, can also drop very valuable industry materials used for supercap construction. These are Nano Regulation Gates, Meta-Molecular Combiners, Nanoscale Filter Plates, and Counter-Subversion Sensor Arrays. The first two in particular are currently selling for nearly or over 500 million ISK each!
The main takeaway from this is that while the oddly named can always has better potential loot, it won’t always be the most valuable can in practice. It’s a safe bet to go for it if you don’t have a cargo scanner. Just make sure you can actually handle the harder hack.
How to Ghost a Ghost Site
There are 3 general strategies for running ghost sites:
- Fit for hacking efficiency or disposability, not tank, with fast align. Hack some cans and get out.
- Fit to tank a can explosion, not the rats, with fast align. Hack until the rats show up, then eat the can explosion and warp off before the rats lock you.
- Fit to tank both the can and the rats. Usually means a slower, less efficient ship unless you’re using a Strategic Cruiser.
Regardless of which particular strategy you use, I recommend offlining your nullifier and warp core stabilizer if you have those modules fit. They decrease your lock range and speed, both of which are important in ghost sites where time is of the essence. You can always online them later. It’s not like people really camp ghost sites.
For the first strategy, whether you go for efficiency or disposability depends on your budget, comfort level, and skills. If you’re not comfortable in your ability to quickly and successfully complete hacks in that type of ghost site, you might want to use a cheap T1 exploration frigate, hack a can or two, and get out. If you lose your cheap ship, so be it. Though if you have solid equipment and skills, I recommend just using your regular exploration ship, like a covops frig. Fit it with a cargo scanner, warp in cloaked, decloak, cargo scan the cans, hack the best one, and leave. As you get more confident, move up to the 2 best cans. This is how I personally run ghost sites.
The main advantage of this strategy is that you don’t need to carry around a refit just in case you come across a fairly rare site, or compromise your ability to explore in general for the sake of tanking ghost sites. Since it’s rare for more than 2 cans to have good loot, especially in null, you aren’t losing much by getting out early.
The second strategy involves fitting enough tank to survive up to 12k explosive damage from a can explosion (or 10k, or however much you need for that area of space). This is doable in an Astero, Pacifier, even a T1 explo frig or covops. You can explore using your regular fit and just have a refit in cargo. Shield is generally easier to fit for than armor due to native explosive resists being much higher for the former, though you might not have enough space for a cargo scanner.
The primary advantage of this strategy is that it lets you be greedy and make full use of the timer. Keep hacking cans until the rats show up, then just warp out and eat the explosion. Sometimes, the timer runs long. You might be able to hack every single can in the site by the time the rats show up; you’d lose out on that loot if you went with the first strategy and bailed early. The downside is that you might not have enough slots remaining to fit a cargo scanner or modules for align time. This makes your looting less efficient.
First up are fits for the T1 explo frigates. These fits can tank a null can explosion cold (10k explosive damage) and a wormhole explosion by overheating the explosive hardener (12k explosive damage). The Heron is the best due to having an extra mid for a cargo scanner, while the Magnate is the worst due to only having the slots for an armor tank and needing explosive resist rigs. I’m trying to keep the rigs as generic exploration ones since I’m assuming you’re going to refit to run ghost sites. Make sure to look at the fits with your own skills. You may need to overheat to tank a null can if your skills are low.
Heron
[Heron, Nomad Ghost Heron]

Damage Control II
Micro Auxiliary Power Core II

5MN Quad LiF Restrained Microwarpdrive
Data Analyzer II
Cargo Scanner II
Republic Fleet Medium Shield Extender
Pith X-Type Explosive Shield Hardener

Improved Cloaking Device II
Core Probe Launcher I, Sisters Core Scanner Probe
[Empty High slot]

Small Gravity Capacitor Upgrade II
Small Hyperspatial Velocity Optimizer I
Small Hyperspatial Velocity Optimizer I


Caldari Navy Hornet x3
Caldari Navy Hornet x1
Hornet EC-300 x3


Nanite Repair Paste x150
Sisters Core Scanner Probe x8'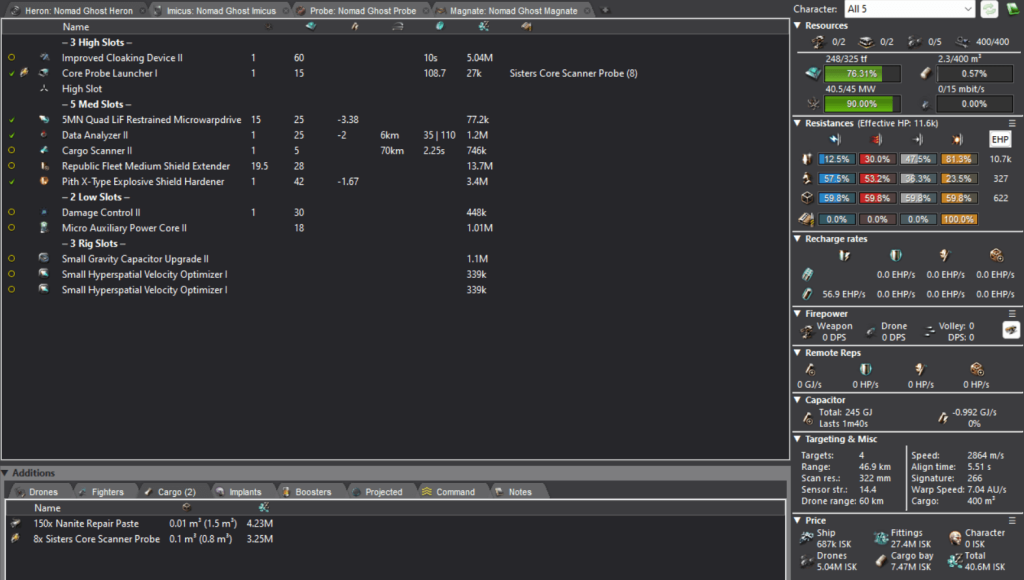
Imicus
[Imicus, Nomad Ghost Imicus]

Damage Control II
Power Diagnostic System II
Micro Auxiliary Power Core II

5MN Quad LiF Restrained Microwarpdrive
Data Analyzer II
Republic Fleet Medium Shield Extender
Pith X-Type Explosive Shield Hardener

Improved Cloaking Device II
Core Probe Launcher I, Sisters Core Scanner Probe
[Empty High slot]

Small Gravity Capacitor Upgrade II
Small Hyperspatial Velocity Optimizer I
Small Hyperspatial Velocity Optimizer I


Caldari Navy Hornet x4
Hornet EC-300 x4


Nanite Repair Paste x150
Sisters Core Scanner Probe x8
Probe
[Probe, Nomad Ghost Probe]

Damage Control II
Power Diagnostic System II
Micro Auxiliary Power Core II

5MN Quad LiF Restrained Microwarpdrive
Data Analyzer II
Republic Fleet Medium Shield Extender
Pith X-Type Explosive Shield Hardener

Improved Cloaking Device II
Core Probe Launcher I, Sisters Core Scanner Probe
[Empty High slot]

Small Gravity Capacitor Upgrade II
Small Hyperspatial Velocity Optimizer I
Small Hyperspatial Velocity Optimizer I


Caldari Navy Hornet x3
Caldari Navy Hornet x1
Hornet EC-300 x3


Nanite Repair Paste x150
Sisters Core Scanner Probe x8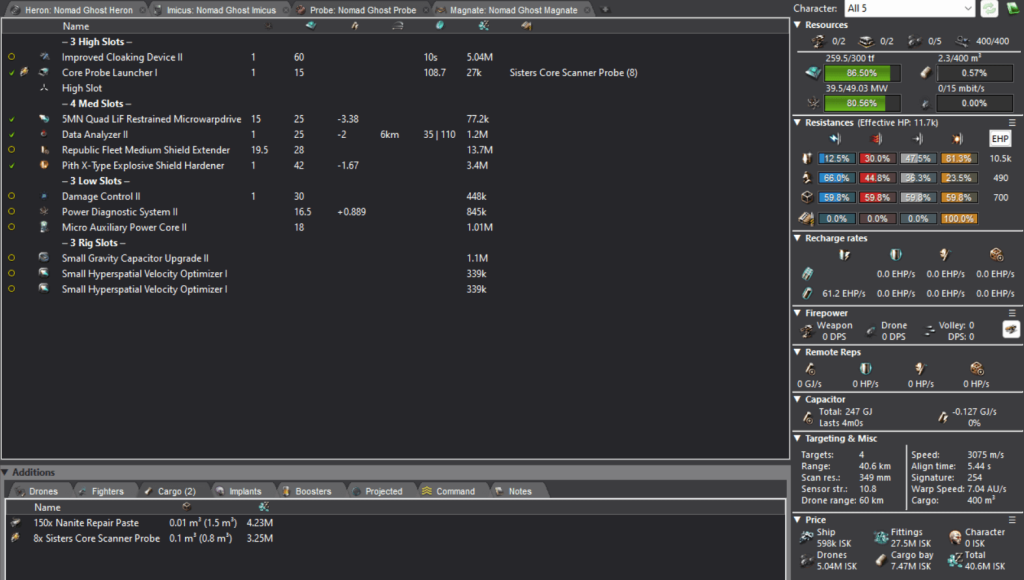
Magnate
[Magnate, Nomad Ghost Magnate]

400mm Rolled Tungsten Compact Plates
Navy Micro Auxiliary Power Core
Shadow Serpentis Explosive Armor Hardener
Shadow Serpentis Explosive Armor Hardener

5MN Y-T8 Compact Microwarpdrive
Data Analyzer II
Cargo Scanner II

Improved Cloaking Device II
Core Probe Launcher I, Sisters Core Scanner Probe
[Empty High slot]

Small Gravity Capacitor Upgrade II
Small Explosive Armor Reinforcer I
Small Explosive Armor Reinforcer I


Caldari Navy Hornet x3
Caldari Navy Hornet x1
Hornet EC-300 x3
Hornet EC-300 x1


Nanite Repair Paste x150
Sisters Core Scanner Probe x8
Next up is the Astero, which can tank a ghost site explosion with a shield or armor fit. The benefit of a shield fit is that all your lows are free for easy instawarp. The benefit of an armor fit is that you have space for a cargo scanner.
Shield Astero
[Astero, Nomad Ghost Shield]

Damage Control II
Inertial Stabilizers II
Inertial Stabilizers II
Overdrive Injector System II

5MN Quad LiF Restrained Microwarpdrive
Data Analyzer II
Republic Fleet Medium Shield Extender
Pith X-Type Explosive Shield Hardener

Covert Ops Cloaking Device II
Sisters Core Probe Launcher, Sisters Core Scanner Probe

Small Gravity Capacitor Upgrade I
Small Hyperspatial Velocity Optimizer II
Small Hyperspatial Velocity Optimizer II


Caldari Navy Hornet x5
Hornet II x5
Hornet EC-300 x5


Nanite Repair Paste x150
Sisters Core Scanner Probe x8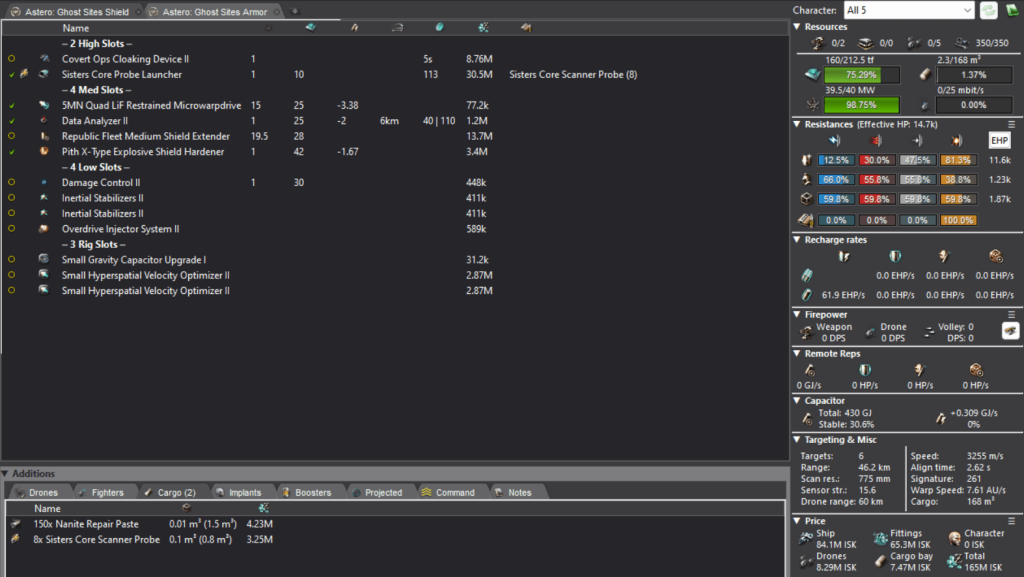
Armor Astero
[Astero, Nomad Ghost Armor]

400mm Rolled Tungsten Compact Plates
Shadow Serpentis Explosive Armor Hardener
Shadow Serpentis Explosive Armor Hardener
Micro Auxiliary Power Core II

5MN Quad LiF Restrained Microwarpdrive
Data Analyzer II
Relic Analyzer II
Cargo Scanner II

Covert Ops Cloaking Device II
Sisters Core Probe Launcher, Sisters Core Scanner Probe

Small Gravity Capacitor Upgrade I
Small Hyperspatial Velocity Optimizer II
Small Hyperspatial Velocity Optimizer II


Caldari Navy Hornet x5
Hornet II x5
Hornet EC-300 x5


Nanite Repair Paste x150
Sisters Core Scanner Probe x8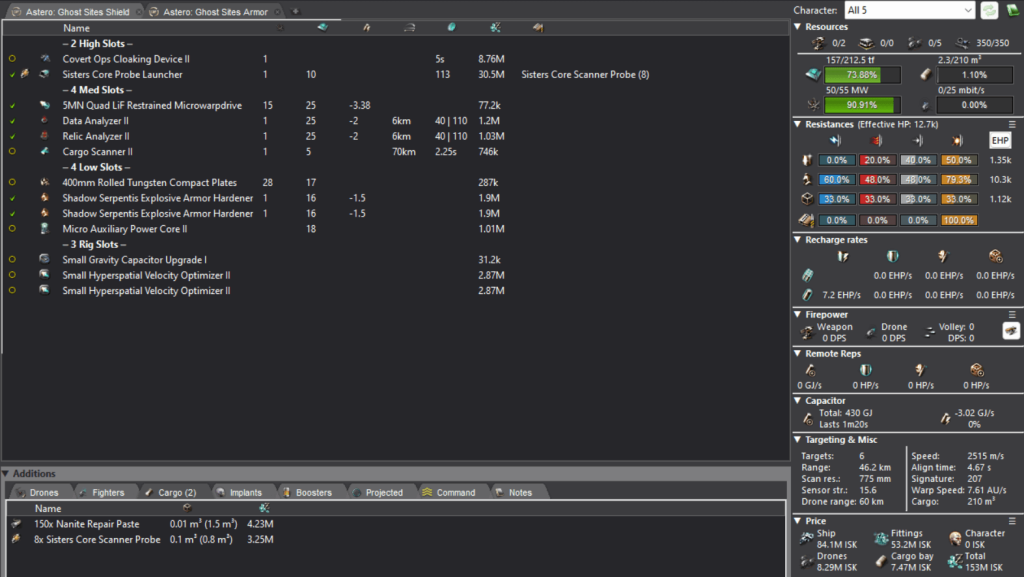
The T2 covops frigates are next. All of them can be fit to shield-tank a ghost can explosion, though they do require fitting modules to make it work. The Buzzard and Helios are best because they have a 5th mid for a cargo scanner. The Anathema can manage a decently quick align. The Cheetah sucks, as usual. At least it’s fast.
Buzzard
[Buzzard, Nomad Ghost Buzzard]

Inertial Stabilizers II
Power Diagnostic System II
Micro Auxiliary Power Core II

5MN Y-T8 Compact Microwarpdrive
Data Analyzer II
Republic Fleet Medium Shield Extender
Cargo Scanner II
Pith X-Type Explosive Shield Hardener

Covert Ops Cloaking Device II
Sisters Expanded Probe Launcher
Interdiction Nullifier I /OFFLINE

Small Gravity Capacitor Upgrade I
Small Ancillary Current Router II


Nanite Repair Paste x150
Sisters Combat Scanner Probe x16
Sisters Core Scanner Probe x16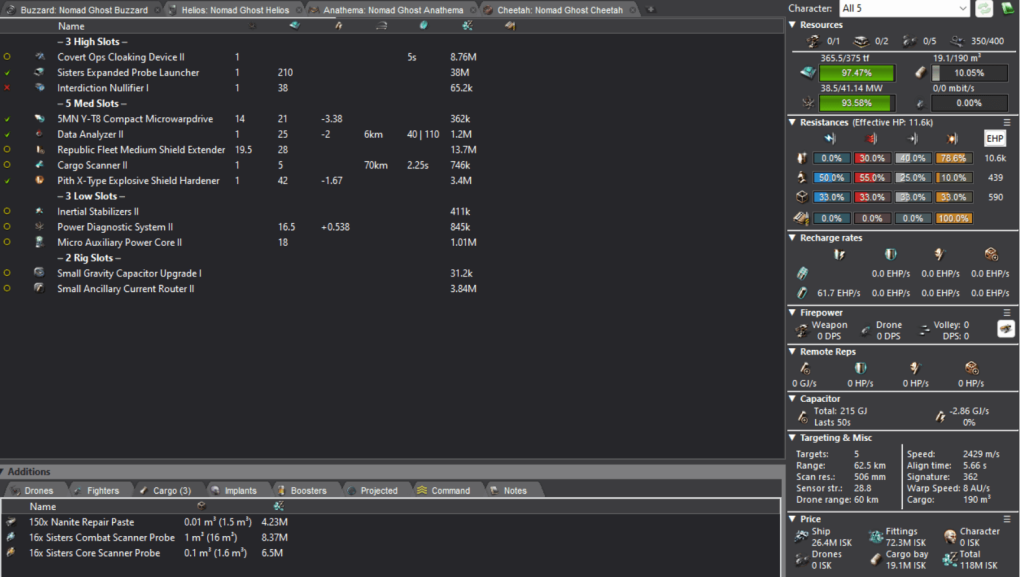
Helios
[Helios, Nomad Ghost Helios]

Damage Control II
Power Diagnostic System II
Micro Auxiliary Power Core II

5MN Quad LiF Restrained Microwarpdrive
Data Analyzer II
Republic Fleet Medium Shield Extender
Cargo Scanner II
Pith X-Type Explosive Shield Hardener

Covert Ops Cloaking Device II
Sisters Core Probe Launcher, Sisters Core Scanner Probe
Interdiction Nullifier I /OFFLINE

Small Gravity Capacitor Upgrade II
Small Hyperspatial Velocity Optimizer II


Hornet EC-300 x1


Nanite Repair Paste x150
Sisters Core Scanner Probe x8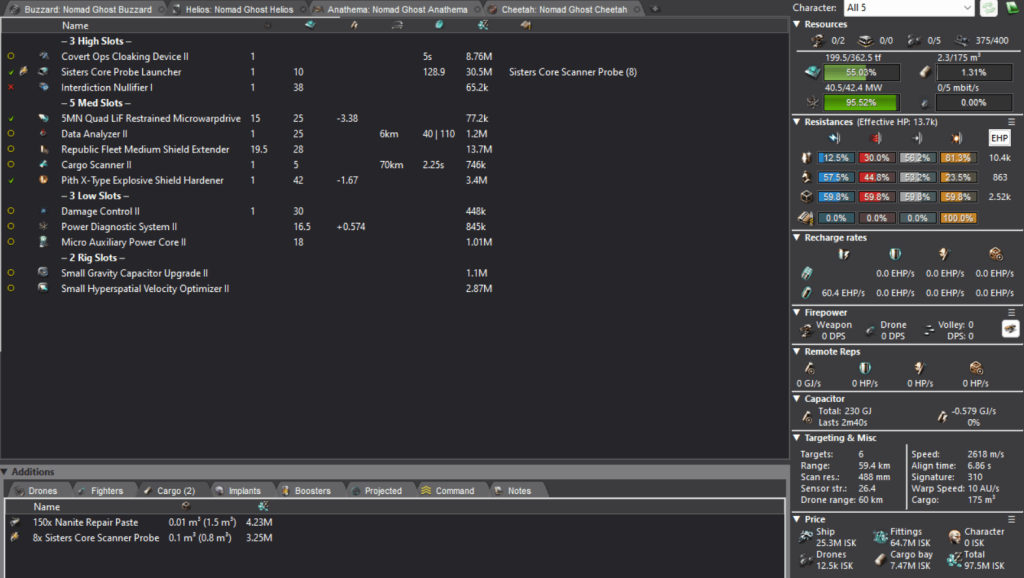
Anathema
[Anathema, Nomad Ghost Anathema]

Inertial Stabilizers II
Inertial Stabilizers II
Inertial Stabilizers II
Micro Auxiliary Power Core II

5MN Quad LiF Restrained Microwarpdrive
Data Analyzer II
Republic Fleet Medium Shield Extender
Pith X-Type Explosive Shield Hardener

Covert Ops Cloaking Device II
Sisters Expanded Probe Launcher
Interdiction Nullifier I /OFFLINE

Small Gravity Capacitor Upgrade II
Small Hyperspatial Velocity Optimizer II


Nanite Repair Paste x150
Sisters Combat Scanner Probe x16
Sisters Core Scanner Probe x16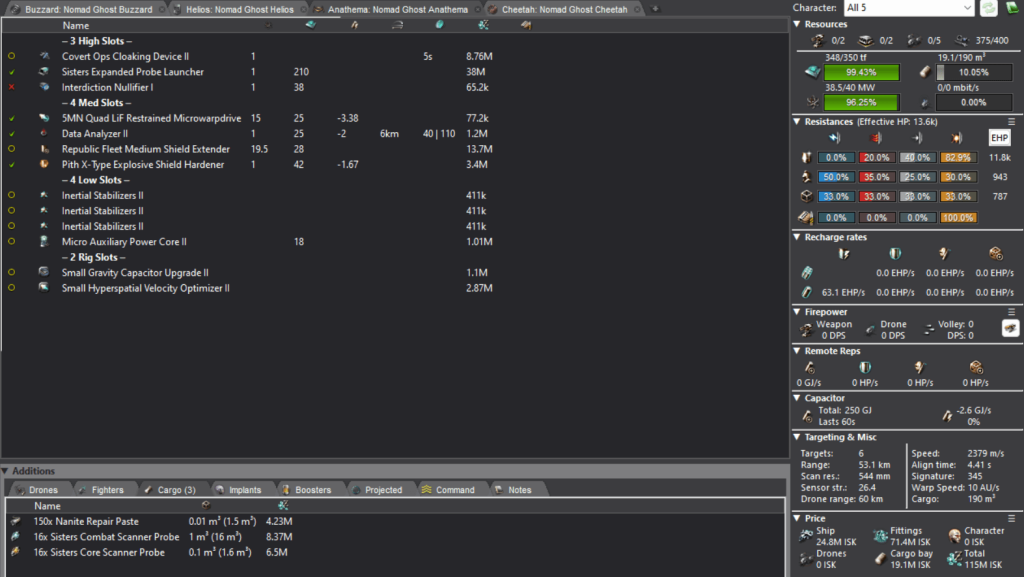
Cheetah
[Cheetah, Nomad Ghost Cheetah]

Damage Control II
Power Diagnostic System II
Micro Auxiliary Power Core II
Micro Auxiliary Power Core II

5MN Quad LiF Restrained Microwarpdrive
Data Analyzer II
Republic Fleet Medium Shield Extender
Pith X-Type Explosive Shield Hardener

Covert Ops Cloaking Device II
Sisters Core Probe Launcher, Sisters Core Scanner Probe
Interdiction Nullifier I /OFFLINE

Small Gravity Capacitor Upgrade II
Small Hyperspatial Velocity Optimizer II


Nanite Repair Paste x150
Sisters Core Scanner Probe x8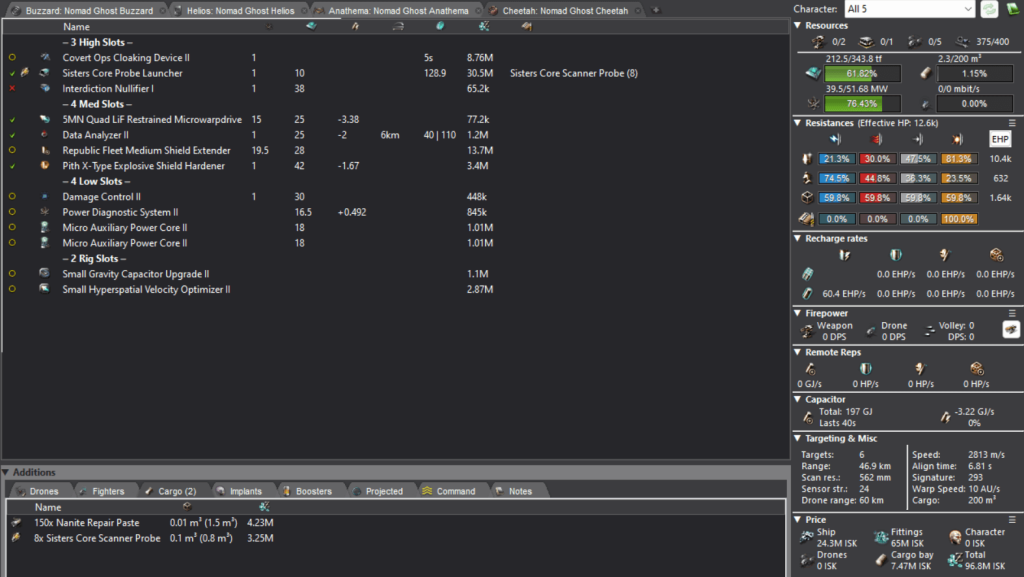
I’m sure you can figure out how to make a navy explo frig or Pacifier work. The Paci can be shield or armor tanked. A Metamorphosis only really works with armor due to its very limited slot layout, and even then you need 2 explosive rigs to get enough buffer:
Metamorphosis
[Metamorphosis, Nomad Ghost Meta]

400mm Rolled Tungsten Compact Plates
Shadow Serpentis Explosive Armor Hardener
Caldari Navy Power Diagnostic System

5MN Y-T8 Compact Microwarpdrive
Data Analyzer II
Cargo Scanner II

Covert Ops Cloaking Device II
Sisters Expanded Probe Launcher
[Empty High slot]

Small Gravity Capacitor Upgrade I
Small Explosive Armor Reinforcer II
Small Explosive Armor Reinforcer II


Caldari Navy Hornet x3
Caldari Navy Hornet x1
Hornet EC-300 x3
Hornet EC-300 x1


Nanite Repair Paste x150
Sisters Combat Scanner Probe x16
Sisters Core Scanner Probe x16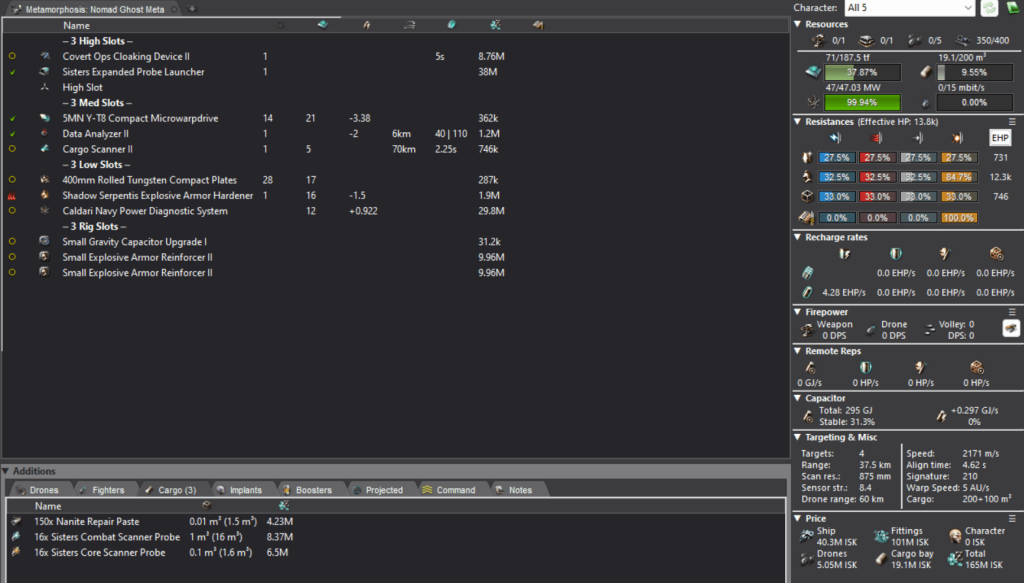
The third strategy involves flying something that can tank both the can explosion and rats until they leave. A Stratios or T3C can pull this off just fine. However, I’m not sure why you’d bother with this over the 2nd strategy unless you’re already flying around in a bigger ship because you’re hunting DEDs or whatnot. If that’s the case, just refit for maximum tank and you’ll be fine.
Whatever strategy you use, I highly recommend using both a MWD and a cargo scanner if you have a spare mid for it. An MWD is invaluable for burning between ghost site cans, and this is a site where you actually want to do that instead of pinging off a perch bookmark, since cargo scanning is advantageous due to loot differences between the cans and the cans are close enough that a MWD is likely to be faster than warping back and forth.
Where to Hunt for Ghost Sites
As with all things exploration, stay out of hisec. The loot isn’t good and the competition’s severe. Lowsec, null, and wormhole ghost sites each have their own merits. In lowsec, you’re guaranteed to get Electro-Neural Signallers from the 5th can that are worth a pretty penny. Also, the hacks are easy. In null, you’ll face less competition and can get both Magpie BPCs and valuable supercap inputs like Meta-Molecular Combiners from the oddly named Secure Mainframe can. And in wormholes, you have a chance at HG Ascendancy Omega BPCs from Secure Vault cans; they’re one of the most valuable exploration drops in the game. However, scanning through wormholes takes time and the hacks are actually challenging. If you’re hunting ghost sites in null or Anoikis, a Zeugma Analyzer and Blackglass implant are good investments.
The dronelands are arguably the best space for hunting ghost sites. Dronelands ghost sites appear as level 1 combat sites in the probe scanner, with tiny 4au spheres. This makes them extremely easy to identify without actually needing to scan anything. The Spire and The Kalevala Expanse are probably the best drone regions to do this in, since they have the worst actual drone data sites and therefore the least competition.
With supercap industry materials being so expensive as of writing, it’s never been a better time to run ghost sites in null or wormholes. So go out there and get scanning.
That’s it for ghost sites! Ghost. Site. Those don’t look like real words anymore. Send help.
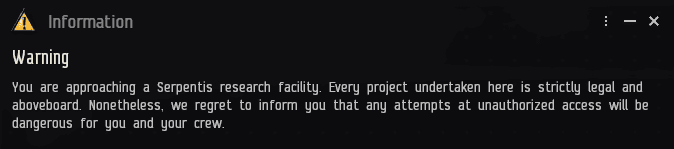
P.S. When you initiate warp to a ghost site, you’ll get a cute faction-themed message warning you about all the terrible things that’ll happen:
Thanks for posting this guide, its really helpful and lets newbro’s know what ships and fits to start working towards.